.JPG)
Annual flower meadows are very attractive, easy to create
and flower in summer and autumn if sown in spring. You can quickly cover large
areas with colourful flowers and provide important foraging habitat for
pollinators and other wildlife. If initial ground preparation was thorough
annual meadows are largely maintenance-free once established. They are ideal
for areas which would otherwise lie idle and as you only commit to annual
meadows for a year the ground will be free again the next year for something else.
If you want to enjoy your annual meadow year after year you have to resow every
spring with fresh seed as annual meadows do not regrow well in the second year
if left alone and weeds would take over.
 |
| Bombus terrestris/lucorum in a Californian poppy flower |
Follow these simple steps below to create your own annual
flower meadow in your garden or allotment next year:
 |
| A colorful seed mix with poppies and cornflowers |
1. First you have to choose the seed mix you want to use. There
are many different annual seed mixes available; low-growing mixes, tall-growing
mixes, cornfield seed mixes, seed mixes with different colour schemes and a lot
more and most seed companies offer at least one annual seed mix. All you have
to do is choosing one you like. There are also some seed companies which have
specialised in colourful meadow seed mixes such as
Pictorial Meadows based in Sheffield.
You aim for a sowing rate of about 2.5-3g/m2 so
make sure you buy enough seed for your chosen area.
2. Chose the meadow site: Annual meadows grow best in full sun
on fertile well-drained soil which does not dry out in summer. Ordinary garden
soil should normally be good enough to grow an annual meadow but if in doubt
you can add fertiliser to the soil.
 |
| Careful ground preparation is essential before sowing |
3. Ground preparation will start in early spring once the soil
is starting to warm up. If you have not done so already dig (or rotovate) the
ground and remove any weeds you see. Look for roots of perennial weeds such as
Couch grass, Ground elder and Bindweed and remove every little piece as they
can grow back from tiny root fragments. To prepare the seed bed level the
ground and rake the soil to a fine tilth.
4. Do not sow immediately but wait a few weeks (ideally you
have a period of warm and moist weather) to let weed seeds germinate. Kill off
all weed seedlings either by hoeing or by using a weedkiller such as Glyphosate
if you do not mind using herbicides. By doing this weed growth in your meadow
will be considerably reduced.
 |
| Mix your seed with sand to help with sowing |
5. Once your seed bed looks relatively weed-free you are ready
to sow your annual seed mix. Mix the seeds with dry sand (about 1:10) so you
can see were you have sown already. It will also help distribute the seeds more
evenly over the area.
If you have a small area to sow you can just scatter the
seed/sand mix evenly over the whole area. If you have a larger area to sow it
helps to split the area into several sections and divide the seed/sand mix
within each of these areas.
After you have scattered the seeds rake lightly. If no rain
is forecast you can water your meadow a few times until the seeds germinate if
the area is not too large.
 |
| Scatter the seed evenly over the area |
 |
| Rake lightly after sowing |
7. Sit back, relax and watch your annual meadow grow. Also enjoy all the bees, butterflies and hoverflies the meadow will bring into your garden.
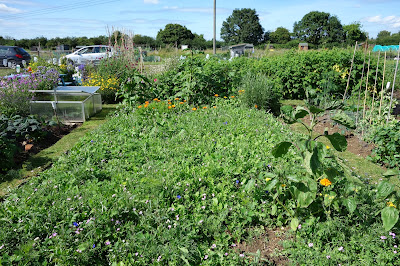
Below you can see the flower meadow I have sown on my allotment this year. The meadow looked great until July but suffered a lot in the heat wave we had in summer and finished flowering early in August. In a wetter year the meadow would have carried on flowering until the first sharp frosts.
 |
| 6 May 2013, meadow sown |
 |
| 15 June 2013 |
 |
| 29 June 2013 |
 |
| 5 July 2013 |
 |
| 14 July 2013 |
 |
| 21 July 2013 |
.JPG) Annual flower meadows are very attractive, easy to create
and flower in summer and autumn if sown in spring. You can quickly cover large
areas with colourful flowers and provide important foraging habitat for
pollinators and other wildlife. If initial ground preparation was thorough
annual meadows are largely maintenance-free once established. They are ideal
for areas which would otherwise lie idle and as you only commit to annual
meadows for a year the ground will be free again the next year for something else.
If you want to enjoy your annual meadow year after year you have to resow every
spring with fresh seed as annual meadows do not regrow well in the second year
if left alone and weeds would take over.
Annual flower meadows are very attractive, easy to create
and flower in summer and autumn if sown in spring. You can quickly cover large
areas with colourful flowers and provide important foraging habitat for
pollinators and other wildlife. If initial ground preparation was thorough
annual meadows are largely maintenance-free once established. They are ideal
for areas which would otherwise lie idle and as you only commit to annual
meadows for a year the ground will be free again the next year for something else.
If you want to enjoy your annual meadow year after year you have to resow every
spring with fresh seed as annual meadows do not regrow well in the second year
if left alone and weeds would take over.


Some great inspiration here!!
ReplyDeleteKeep up the good work for all those desperate pollinators and the willing gardeners equally desperate to make them happy!
grt
ReplyDelete